Follow these thermometer drying guidelines to ensure accuracy and maximum use.
Properly drying a thermometer after washing, rinsing, and sanitizing is crucial for maintaining its accuracy and preventing damage. Failing to dry your thermometer correctly can lead to inaccurate readings, cross-contamination, and even premature failure of the device.
In this article, we'll walk you through 5 simple steps to ensure your thermometer is dried effectively every time. From air drying techniques to gentle shaking methods, you'll learn the best practices for how you should dry a thermometer after washing, rinsing, and sanitizing it to keep yours in top condition.
Key points covered:
- Air drying is the most effective way to dry a food thermometer.
- In most cases, allowing the thermometer to air dry for 30-60 minutes should be sufficient.
- A properly dried thermometer is essential for accurate readings and long-lasting performance.
- Never store or use your thermometer until it is completely dry, as any remaining moisture can lead to inaccurate readings or damage to the device.
- Never expose the thermometer to extreme temperatures, such as placing it near a heat source or in direct sunlight, as this can affect its accuracy.
- Common signs of thermometer damage include: cracks or splits in the thermometer casing, condensation or fogging inside the dial, bent or broken probe, and an unresponsive or sluggish display.
- Digital, dial, and infrared thermometers are three of the most popular types of thermometers in the food industry.
- Proper cleaning and drying food thermometers helps prevent cross-contamination, ensure accurate temperature readings, and maintain their longevity.
- FoodDocs' food safety software helps businesses quickly and easily monitor and record food, fridge, and freezer temperatures in an all-in-one FSMS that keeps them compliant.
Proper thermometer drying techniques: ensure accuracy and prevent damage
Use either of these two techniques to safely dry your food thermometers and keep them working for the long haul.
Air drying: the safest and most effective method
After washing, rinsing, and sanitizing a thermometer, the best way to dry it is by allowing it to air dry completely. Place the thermometer on a clean, dry surface with the probe pointing up. This position allows any remaining water to drain away from the sensitive components inside the thermometer.
Avoid using towels, cloths, or paper towels to dry the thermometer, as they can introduce contaminants or leave lint on the surface. These materials can also potentially scratch or damage the thermometer's probe or display.
How long should you allow a thermometer to air dry?
The time required for a thermometer to air dry completely depends on the ambient temperature and humidity. In most cases, allowing the thermometer to air dry for 30 minutes to an hour should be sufficient. However, if you're in a humid environment, it may take longer for the thermometer to dry completely.
Gentle shaking: removing excess water
Before allowing the thermometer to air dry, you can gently shake it to remove any excess water droplets. Because you're removing the bulk of the water, this step can help speed up the drying process.
When shaking the thermometer, be careful not to shake it too vigorously, as this can damage the delicate components inside. Firmly hold the thermometer's handle or body and give it a few gentle shakes over a sink or container to catch the water droplets.
Why Is gentle shaking important?
Shaking the thermometer too hard can cause damage to the probe, which is the most sensitive part of the device. The probe contains the temperature sensor, and any damage to this component can lead to inaccurate readings or complete failure of the thermometer.
Additionally, rough handling can also damage the display or other electronic components, rendering the thermometer unusable. If you want to avoid risking damage to the device, just gently shake the thermometer to remove excess water.
How to dry a thermometer after washing, rinsing, and sanitizing (in 5 easy steps)
Step 1: Wash the thermometer
To begin the sanitizing process, place your thermometer in water and wash it with warm, soapy water. Pay close attention to the probe, as it comes into direct contact with food and requires thorough cleaning. Use a soft-bristled brush or cloth to gently scrub the probe and body of the thermometer, removing any visible food particles or debris.
Rinse the thermometer thoroughly under running water to remove all soap residue. Make sure to rinse the probe and body completely, as any remaining soap can interfere with the accuracy of future readings. Take your time during this step to ensure that the thermometer is clean and free of any soap or debris.
Step 2: Rinse with clean water
After washing the thermometer with soap and water, it's crucial to rinse it again with clean, running water. This step helps to remove any remaining soap residue that may have been missed during the initial rinse.
Hold the thermometer under running water for several seconds, making sure that the water flows over the entire probe and body. Inspect the thermometer closely to ensure that all soap and debris have been removed. If you notice any remaining residue, continue rinsing until the thermometer is completely clean.
Don't forget: even small amounts of soap residue can affect the accuracy of your thermometer readings, so it's essential to be thorough during this step.
Step 3: Sanitize the Thermometer
Now that your thermometer is clean, it's time to sanitize it to eliminate any remaining bacteria or pathogens. You can use either alcohol or a food-safe sanitizer for this step.
If using alcohol, choose a solution with at least 70% ethanol or isopropyl alcohol. Dip the thermometer probe and body into the alcohol solution for at least 30 seconds to ensure thorough sanitization. Make sure the entire probe and body are submerged in the solution.
When using a food-safe sanitizer, follow the manufacturer's instructions for the proper concentration and contact time. Most sanitizers require dilution with water, so be sure to mix the solution according to the recommended ratio. Dip the thermometer probe and body into the sanitizing solution for the specified time, ensuring complete coverage.
Importance of proper thermometer sanitization
Sanitizing your thermometer is a critical step in preventing the spread of foodborne illnesses. Eliminating harmful bacteria and pathogens will reduce the risk of cross-contamination between different food items and ensure that your thermometer readings are not only accurate but also safe.
Proper sanitization is especially important when using the thermometer to check the internal temperatures of raw meats, poultry, and seafood, as these foods are more likely to harbor harmful bacteria. Taking the time to sanitize your thermometer helps to protect both the quality of your food and the health of the your costumers.
Step 4: Rinse with clean water (if required)
After sanitizing your thermometer, check the sanitizer's instructions to determine if rinsing is required. Some sanitizers, particularly those used in food-service settings, may not require rinsing, as they are formulated to be safe for direct contact with food surfaces.
If the sanitizer does require rinsing, hold the thermometer under clean, running water once again. Rinse the probe and body thoroughly to remove any sanitizer residue that could potentially affect the thermometer's accuracy or impart an unpleasant taste to food.
Rinsing is a crucial step when using certain sanitizers, as it ensures that your thermometer is not only clean and sanitized but also free of any chemical residues that could compromise its performance or the quality of your food.
Step 5: Dry the thermometer
Once your thermometer is clean, sanitized, and rinsed (if necessary), it's time to dry it thoroughly. Proper drying is essential to maintain the thermometer's accuracy and prevent damage to its internal components.
Refer to the drying techniques outlined in the previous section, which include air drying and gentle shaking. If air drying, place the thermometer on a clean, dry surface and allow it to air dry completely. This may take several minutes, depending on the humidity and temperature of your environment.
If you choose to shake the thermometer to remove excess water, do so gently to avoid damaging the delicate probe or internal components. After shaking, you may still need to allow the thermometer to air dry for a short period to ensure it is completely moisture-free.
A properly dried thermometer is essential for accurate readings and long-lasting performance. Never store or use your thermometer until it is completely dry, as any remaining moisture can lead to inaccurate readings or damage to the device.
Following these step-by-step instructions for sanitizing and drying your thermometer will help cooks and food handlers maintain its accuracy, prevent damage, and ensure that it remains a reliable tool for monitoring food temperatures and safety. Incorporating these steps into your regular thermometer maintenance routine will help you consistently produce high-quality, safe food products.
Best way to prevent damage during thermometer drying
Improper handling can lead to a thermometer that gives improper readings, or worse, fails to give a read altogether.
Handle thermometers with care
After washing, rinsing, and sanitizing your thermometer, it's essential to handle it with care during the drying process. Thermometers contain delicate components, such as the probe and display, which can be easily damaged if not handled properly. According to the National Institute of Standards and Technology (NIST), improper handling can lead to significant errors in thermometer readings.
When drying your thermometer, always use a soft, clean cloth or paper towel. Gently pat the thermometer dry, avoiding any rough or abrasive movements that could scratch or damage the surface.
Pay special attention to the probe, as this is the most sensitive part of the thermometer. The American Society for Testing and Materials (ASTM) recommends using a soft, lint-free cloth for drying thermometers to prevent damage.
Common mistakes to avoid
During the drying process, there are several common mistakes to avoid:
- Do not aggressively shake or swing the thermometer to remove excess water, as this can cause internal damage
- Avoid using rough or abrasive materials, such as scrub pads or coarse towels, which can scratch the surface
- Never expose the thermometer to extreme temperatures, such as placing it near a heat source or in direct sunlight, as this can affect its accuracy. The International Organization for Standardization advises against exposing thermometers to temperatures above 40°C (104°F) during storage and handling.
Store thermometers in a safe place
Once your thermometer is completely dry, it's crucial to store it in a safe place to prevent damage and ensure it's ready for its next use. Proper storage helps maintain the accuracy and longevity of your thermometer.
When storing your thermometer, choose a clean, dry location away from extreme temperatures, moisture, and direct sunlight. A dedicated storage case or a clean, dry drawer are ideal options. If your thermometer comes with a protective cover, make sure to use it when storing the device. The National Institute of Standards and Technology recommends storing thermometers in a cool, dry place to maintain their accuracy.
Long-term storage tips
If you won't be using your thermometer for an extended period, consider these long-term storage tips:
- Remove the batteries to prevent leakage and corrosion
- Store the thermometer in its original packaging or a protective case
- Use a thermometer calibration log to label the storage container with the date of the last calibration and the next recommended calibration date.
Following these simple handling and storage guidelines will help prevent damage to your thermometer and ensure it remains accurate and reliable for many future uses.

How to ensure accurate readings after washing and drying thermometers
Here are a few of the best practices that industry professionals follow:
Calibrate regularly
Calibrating your thermometer on a regular basis is essential to ensure accurate temperature readings. The frequency of calibration may vary depending on the type of thermometer and its usage. Follow the manufacturer's instructions for calibration, as the process can differ between models. Some thermometers may require calibration before each use, while others can be calibrated less frequently.
Regular calibration is particularly important after washing and sanitizing the thermometer. The cleaning process can potentially affect the accuracy of the device, so it's crucial to calibrate it afterward. This step helps maintain the thermometer's precision and reliability, ensuring that you can trust the readings it provides.
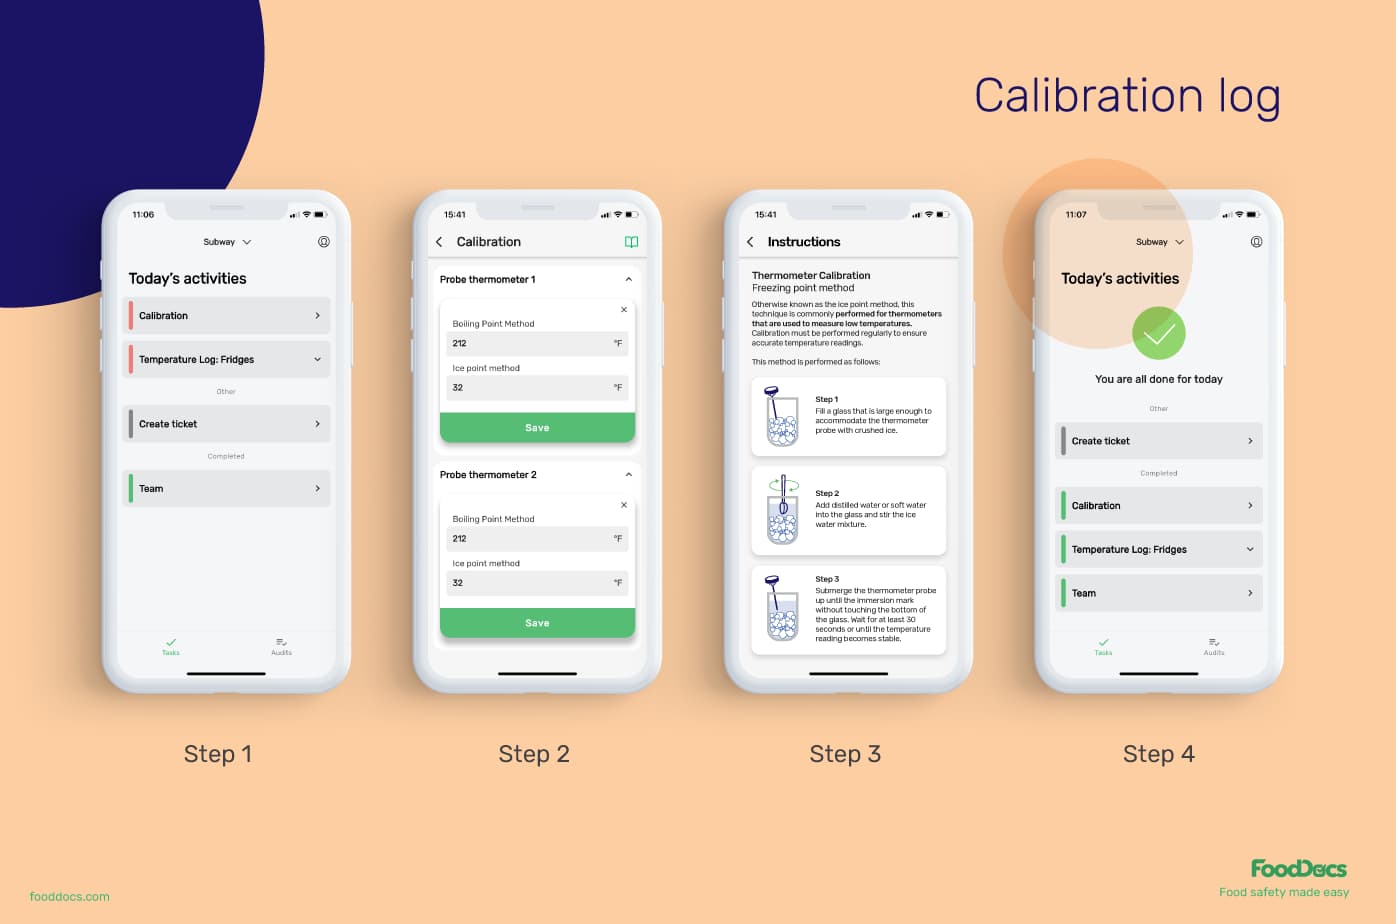
 FoodDocs can support your food thermometer calibration needs with accurate and easy-to-fill logs.
Check for signs of damage
Before using your thermometer, always inspect it for any signs of damage. Look for cracks, splits, or condensation inside the dial, as these issues can compromise the accuracy of the readings. If you notice any damage, it's best to replace the thermometer to ensure accurate and safe measurements.
Regular food safety and health inspections help catch any problems early, preventing inaccurate readings and potential health risks. In food service settings, using a damaged or inaccurate thermometer can lead to improperly cooked food, which may cause foodborne illnesses.
Identifying and addressing any damage promptly lets you maintain a high standard of food safety compliance and protect your customers' health.
Common signs of thermometer damage
- Cracks or splits in the thermometer casing
- Condensation or fogging inside the dial
- Bent or broken probe
- Unresponsive or sluggish display
If you notice any of these signs, discontinue use of the thermometer and replace it with a new, properly functioning device.
Store thermometers properly
Proper storage of your thermometers can help maintain their accuracy and longevity. After washing, rinsing, and drying the device, store it in a clean, dry place away from extreme temperatures and direct sunlight. Avoid storing thermometers in areas with high humidity, as moisture can affect their performance and lead to damage.
If your thermometer comes with a protective case or sheath, use it to keep the device safe from damage during storage. This extra layer of protection can help prevent accidental drops, bumps, or scratches that could compromise the thermometer's accuracy.
Use appropriate thermometers for each task
Different tasks require different types of thermometers. For example, when checking the internal temperature of meat, use a meat thermometer with a long, thin probe to reach the thickest part of the cut without touching bone or fat. When measuring the temperature of liquids, such as soups or sauces, use a thermometer with a clip attachment to secure it to the side of the pot.
Using the appropriate thermometer for each task ensures accurate readings and helps prevent damage to the device. Meat thermometers are designed to withstand higher temperatures than candy thermometers, which are meant for lower-temperature applications.
Keep thermometers clean
In addition to washing and sanitizing your thermometers after each use, it's important to keep them clean between uses. Wipe down the probe and casing with a clean, damp cloth to remove any food residue or debris. This simple step can help prevent cross-contamination and maintain the thermometer's accuracy.
If you notice any stubborn residue or stains on your thermometer, consult the manufacturer's instructions for guidance on safe cleaning methods. Some thermometers may have specific requirements, such as avoiding certain cleaning agents or not submerging the device in water.
What is a food thermometer? Definition and purpose
A thermometer is a device designed to measure and display temperature readings accurately. In the food service industry, thermometers play a crucial role in ensuring food safety and preventing foodborne illnesses. Monitoring the temperature of food during cooking, storage, and holding processes will help food service professionals determine if the food has been maintained at safe temperatures, minimizing the risk of bacterial growth and contamination.
According to the United States Department of Agriculture (USDA), the temperature danger zone for bacterial growth in food is between 40°F and 140°F (4.4°C and 60°C). The USDA states, "Bacteria grow most rapidly in the range of temperatures between 40°F and 140°F, doubling in number in as little as 20 minutes."
Accurate temperature readings provided by thermometers help ensure that food is cooked to the proper internal temperature and held at safe temperatures, reducing the likelihood of foodborne illnesses.
3 Most common types of thermometers in the food industry
Different types of thermometers require different care and maintenance procedures. Some common types of thermometers used in the food industry include:
- Digital thermometers: These are a popular choice in food service settings due to their quick response time and easy-to-read digital displays. They use electronic sensors to measure temperature and provide accurate readings within seconds.These thermometers are often more durable and easier to clean than dial thermometers. However, they may require battery replacement and can be damaged by exposure to extreme temperatures or moisture. In addition to monitoring internal meat temperatures and hot holding units, they can also help to ensure the proper cooling of prepared foods.
- Dial thermometers: Dial thermometers feature a circular dial display and are often used for measuring the internal temperature of larger cuts of meat, such as roasts or turkeys. They're typically less expensive than digital thermometers but can be more difficult to read and clean. They may also require calibration more frequently to ensure accuracy.
- Infrared thermometers: These non-contact thermometers are useful for measuring the surface temperature of food quickly (e.g., food in hot holding units, such as steam tables or warming trays). These thermometers use infrared technology to detect the amount of heat emitted by an object and provide a temperature reading without having to come in contact with the food itself. They do not require cleaning between uses but may need to be calibrated periodically to maintain accuracy.
This repurposed and condensed table from the FSIS offers more detail:
Table: Types of food thermometers (speed, placement, and usage)
| Type |
Speed |
Placement |
Usage |
| Digital thermometers |
| Thermocouple |
2-5 seconds |
At least 1/4" into food
Usage: |
Quick readings for thick and thin foods, not for continuous use while cooking, can be calibrated |
| Thermistor |
10 seconds |
At least 1/2" into food |
Measures both thick and thin foods, not for continuous use, some can be calibrated |
| Oven cord thermometer |
10 seconds |
At least 1/2" into food |
Continuous use in oven, not calibratable |
|
Thermometer fork combination
|
2-10 seconds |
At least 1/4" into food |
Good for grilling, not for continuous use, not calibratable |
| Dial thermometers |
|
Oven-safe bimetal
|
1-2 minutes |
2-2.5" into food |
Continuous use in roasts and casseroles, some can be calibrated |
|
Instant-read bimetal
|
15-20 seconds |
2-2.5" into food |
Quick checks at end of cooking, not for continuous use, some can be calibrated |
| Other |
|
Single-use temperature indicators
|
5-10 seconds |
Approximately 1/2" into food |
Disposable, specific temperature ranges |
| Liquid-filled (glass/metal) |
1-2 minutes |
At least 2" into food |
Continuous use in roasts and casseroles, some can be calibrated, potential breakage risk |
When selecting a thermometer for a specific food service application, it is essential to choose the appropriate type based on factors such as accuracy, response time, and ease of use.
Regardless of the type of thermometer used, proper cleaning, sanitizing, and drying are essential for maintaining the device's accuracy and longevity. If you follow these best practices for thermometer care, you and your fellow food service professionals can ensure that you all have reliable tools for monitoring food safety and quality.

Why is proper thermometer cleaning and drying important?
There are three main reasons why:
1. Preventing cross-contamination
Cross-contamination is a serious concern in the food industry, as it can lead to the spread of harmful bacteria and other pathogens from one food item to another. Thermometers, being used to measure the internal temperature of various foods, can easily become a vehicle for cross-contamination if not properly cleaned and sanitized between uses.
Foodborne illnesses caused by cross-contamination can have severe consequences, ranging from mild discomfort to hospitalization and even death in some cases. The Centers for Disease Control and Prevention estimates that each year, 48 million people in the United States get sick, 128,000 are hospitalized, and 3,000 die from foodborne diseases.
To prevent cross-contamination, it is essential to clean and sanitize thermometers before and after each use. This process involves washing the thermometer probe with hot, soapy water, rinsing it thoroughly, and then sanitizing it with an appropriate solution, such as alcohol or a quaternary ammonium compound.
Cleaning and sanitizing frequency
The frequency of cleaning and sanitizing thermometers depends on the type of food being measured and the risk of contamination. For example, when measuring the temperature of raw meat, poultry, or seafood, the thermometer should be cleaned and sanitized after each use to prevent the spread of harmful bacteria like Salmonella or E. coli.
On the other hand, when measuring the temperature of ready-to-eat foods or foods that have already been cooked, cleaning and sanitizing the thermometer between uses may not be necessary unless it comes into contact with a potentially contaminated surface.

2. Ensuring accurate readings
Accurate temperature readings are crucial in the food industry to ensure that food is cooked to a safe internal temperature and to maintain the quality of the final product. Dirty or improperly dried thermometers can lead to inaccurate readings, which can have serious consequences.
When a thermometer is not cleaned and dried properly, food residue, moisture, or sanitizing solution can remain on the probe, affecting its ability to measure temperature accurately. This can result in undercooked food, which may still harbor harmful bacteria, or overcooked food, which can negatively impact its taste, texture, and nutritional value.
Factors affecting thermometer accuracy
Several factors can affect the accuracy of a thermometer, including:
- Calibration: Thermometers should be calibrated regularly to ensure they provide accurate readings. Calibration involves comparing the thermometer's reading to a known standard and adjusting it if necessary. (Unsure? Here's how to calibrate a thermometer.)
- Placement: The placement of the thermometer probe is crucial for obtaining an accurate reading. The probe should be inserted into the thickest part of the food, away from bone, fat, or gristle, to ensure it measures the internal temperature accurately.
- Response time: Different types of thermometers have varying response times, which can affect their accuracy. For example, digital thermometers typically have a faster response time than dial thermometers, making them more suitable for measuring the temperature of thin or small food items.
3. Maintaining thermometer longevity
Proper cleaning and drying of thermometers not only ensure food safety and accuracy but also help extend the life of the device. Thermometers are precision instruments with delicate components that can be easily damaged by improper handling or exposure to moisture.
Neglecting to clean and dry thermometers after each use can lead to the buildup of food residue, which can corrode the probe or cause the device to malfunction. Additionally, exposure to moisture can damage the thermometer's electronic components, leading to inaccurate readings or complete failure.
To maintain the longevity of thermometers, it is essential to follow the manufacturer's instructions for cleaning, sanitizing, and storing the device. This may include using specific cleaning solutions, avoiding immersion in water, and storing the thermometer in a dry, protective case when not in use.
Measuring sanitizing rinse temperature in high-temperature dishwashing machines
Sanitizing food thermometers requires high temperatures, usually with the help of a dishwasher. But there are some important things to know.
Using a dedicated dishwasher thermometer
High-temperature dishwashing machines operate at extremely high temperatures to effectively sanitize dishes, utensils, and other food-contact surfaces. To accurately measure the sanitizing rinse temperature, a dedicated dishwasher thermometer is essential. These thermometers are specifically designed to withstand the harsh conditions inside the dishwasher, including high temperatures, moisture, and detergents.
Dishwasher thermometers are usually mounted on the machine's interior wall or door, providing continuous temperature monitoring throughout the washing cycle. This allows operators to ensure that the sanitizing rinse temperature consistently reaches the required levels for effective sanitization.
Types of dishwasher thermometers
There are several types of dishwasher thermometers available, each with its own advantages:
- Bimetal thermometers: These thermometers use two different metals that expand at different rates when heated, causing the needle to move and indicate the temperature.
- Digital thermometers: These thermometers use electronic sensors to measure the temperature and display it on a digital screen. They often provide more accurate readings and can be easier to read than bimetal thermometers.
- Infrared thermometers: These non-contact thermometers measure the surface temperature of dishes and utensils as they exit the dishwasher. While not as common as bimetal or digital thermometers, they can be useful for spot-checking temperatures.
|
Thermometer type
|
Advantages
|
Disadvantages
|
|
Bimetal
|
Simple, low-cost, and easy to install
|
May be less accurate than digital thermometers
|
|
Digital
|
High accuracy, easy to read, and often includes additional features
|
May be more expensive than bimetal thermometers
|
|
Infrared
|
Non-contact measurement, quick and easy to use
|
Limited to surface temperature measurement, may not be as accurate as other types
|
Temperature requirements for effective sanitization
To ensure effective sanitization, high-temperature dishwashing machines must maintain a specific sanitizing rinse temperature. The U.S. Food and Drug Administration Food Code requires that the sanitizing rinse temperature reaches at least 180°F (82°C) and is maintained for a minimum of 10 seconds. This temperature and exposure time are necessary to kill harmful bacteria, viruses, and other pathogens that may be present on food-contact surfaces.
Regularly monitoring the sanitizing rinse temperature is crucial for maintaining food safety and complying with health department regulations. If the temperature falls below the required level, the dishwasher may not effectively sanitize the dishes and utensils, increasing the risk of foodborne illness.
What factors affect affect sanitizing rinse temperature?
Several factors can impact the sanitizing rinse temperature in a high-temperature dishwashing machine:
- Water pressure: Low water pressure can reduce the flow rate of the sanitizing rinse, making it difficult to maintain the required temperature.
- Water heater performance: A malfunctioning or undersized water heater may not be able to consistently provide water at the necessary temperature for sanitization.
- Dishwasher maintenance: Regular maintenance, including cleaning spray arms and removing lime scale buildup, is essential for ensuring proper water flow and temperature. Failure to perform regular maintenance can lead to reduced sanitizing rinse temperatures, compromising food safety.
Regular maintenance is critical to ensure the dishwasher operates within the required temperature range. This includes tasks such as cleaning the spray arms, checking and replacing worn-out parts, and descaling the machine to prevent lime scale buildup. Perform these tasks regularly to ensure the dishwasher consistently reaches the necessary sanitizing rinse temperature.
How to verify sanitization effectiveness
In addition to monitoring the sanitizing rinse temperature, it's essential to verify that the high-temperature dishwashing machine is effectively sanitizing dishes and utensils. One common method is to use temperature-sensitive tape or labels that change color when exposed to the required temperature for the specified time.
These labels are placed on dishes or utensils before they enter the dishwasher. After the washing cycle, the color change on the label confirms that the sanitizing rinse temperature was adequate for effective sanitization. This method provides a simple, visual way to verify that the dishwasher is operating correctly and meeting food safety standards.
Step-by-step guide to using temperature-sensitive labels:
- Prepare the labels: Obtain temperature-sensitive labels or tape that change color when exposed to the required sanitizing rinse temperature (at least 180°F or 82°C) for a minimum of 10 seconds.
- Apply the labels: Place the labels on dishes or utensils before they enter the dishwasher.
- Run the dishwasher cycle: Complete the washing cycle as usual.
- Verify the results: After the cycle, check the labels for the color change. If the label has changed color, it indicates that the sanitizing rinse temperature was adequate for effective sanitization.
- Record the results: Document the results of the verification process to maintain a record of the dishwasher's performance and ensure compliance with health department regulations.
Mastering thermometer hygiene: your key to food safety
Proper thermometer cleaning, sanitizing, and drying are essential steps in maintaining food safety and ensuring accurate temperature readings. By following the five easy steps outlined in this article, you can effectively wash, rinse, sanitize, and dry your thermometers, preventing cross-contamination and extending the device's lifespan.
How FoodDocs ensures accurate thermometer calibration and monitoring records
You can ensure accurate and consistent thermometer calibration process readings with the help of FoodDocs' digital Food Safety Monitoring System. You can start a free 14-day trial and try it yourself!
With our digital food safety management system, you can always stay on top of your daily food safety operations.
Use the following features:
Easily and accurately fill thermometer calibration logs
Get a digital Thermometer Calibration Log that you can use to record calibration readings digitally with your mobile device.
Access this digital log through any mobile device using our Food Safety App. In case of non-compliance, our system automatically suggests clear instructions on how to calibrate thermometers properly.
Always ensure staff are completing thermometer calibration and cooking temperature logs correctly
Calibration requires precision and accuracy of the process to become effective. So does recording cooking and cooling temperatures. To help food handlers perform proper calibration, our digital Thermometer Calibration Logs are equipped with step-by-step instructions for both Boiling Point and Freezing point methods.
You can also upload your versions of the thermometer calibration program as an image or a video to improve the calibration process.

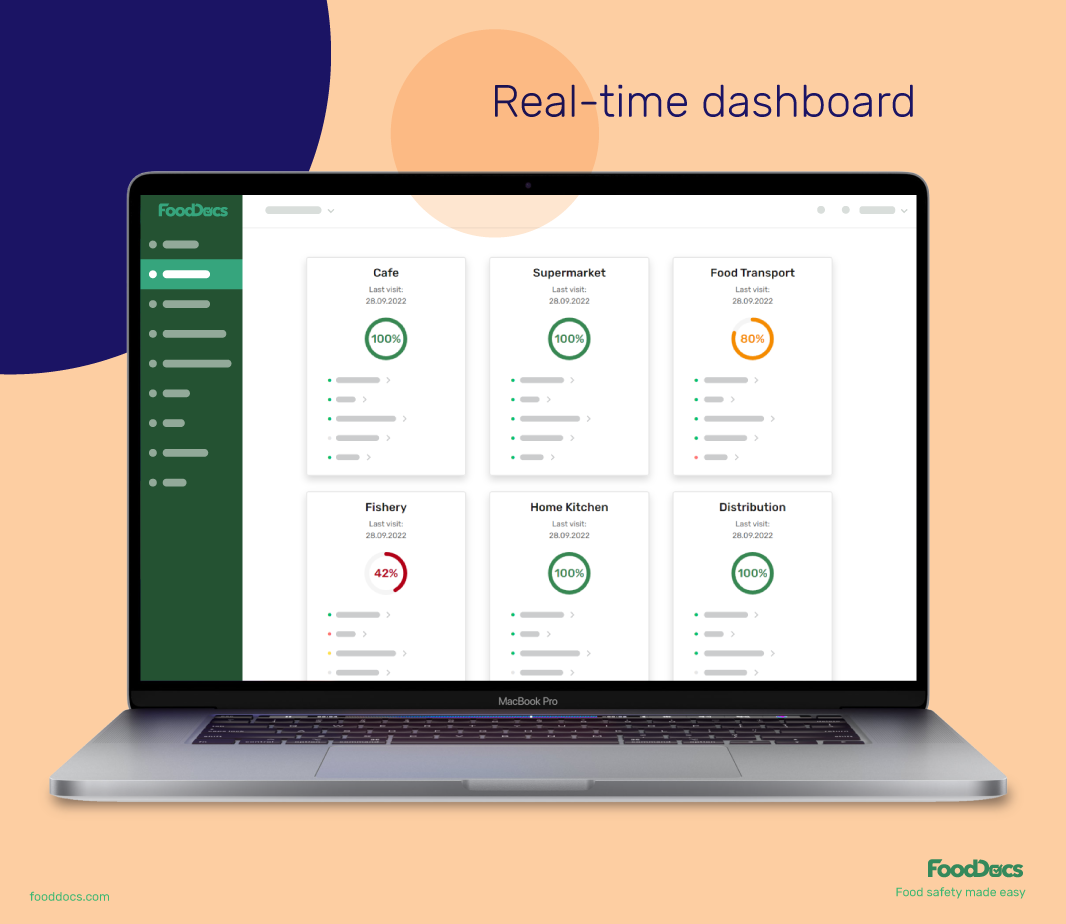
Real-time overview to help supervise the team remotely
Get a real-time overview of your entire food safety operations across your business branches with our real-time dashboard. Using this feature, you can immediately see areas where thermometer calibrations may be required.
The system will show you non-compliant temperature-related monitoring tasks. Such information can help you immediately address the situation and request a thermometer calibration.
Save at least 20% of your time from managing your food safety operations using the real-time food safety dashboard that you will also get.