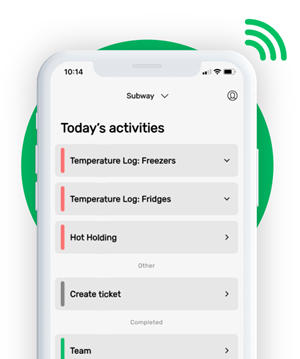


This is how our Digital Food Safety platform saves 20% of your time on daily tasks:
- Get upcoming task notifications
- Add data into the app
- Check the status of tasks in real-time

When food safety was still handled on paper, I typically spent a couple of hours per day getting the papers and going around checking or completing tasks… Now I can sit down and it's just all there in one place. It takes me 5-10 minutes.
Ruth B.
Store Manager
What is a grease trap?
A grease trap is a box, often metal or heavy plastic, installed in the drain line of a sink or facility that separates grease and solids from water.
Wastewater flows into the trap and slows down; because grease is lighter than water, it rises to the top inside the trap, while solids settle at the bottom. Cleaner water exits from the middle layer of the trap into the sewer line, leaving the FOG and food solids trapped behind. This prevents grease from hardening in pipes and causing blockages downstream.

Why is it important to clean a grease trap?
A grease trap needs cleaning because, as grease and solids accumulate, the trap’s efficiency drops. Eventually, the trap can overflow or allow grease to pass through once it’s too full. Regular grease trap cleaning involves removing the built-up FOG and sludge from the trap to keep it working correctly. If grease traps aren’t cleaned routinely, several problems can occur:
- Drainage blockages: Hardened grease will clog pipes, leading to slow drains or sewage backups. A full grease trap can cause wastewater (and smelly grease) to back up into kitchen sinks and floors, disrupting operations.
- Foul odors: Trapped grease and food waste will turn rancid over time, producing persistent foul odors that can permeate the kitchen. A smelly grease trap can create an unpleasant work environment and deter customers if odors reach dining areas.
- Pest attraction: The grease and food residues in an unclean trap attract pests like rodents and cockroaches, creating a sanitation issue, which is why restaurant pest control matters so much.
- Health and safety violations: Backed-up or leaking grease creates unsanitary conditions and could lead to health code violations. In extreme cases, authorities can shut down a kitchen that isn’t managing its grease waste properly.
- Environmental harm: If grease escapes into the municipal wastewater system, it can overload sewers and interfere with wastewater treatment. Untreated FOG can wreak havoc on sewer infrastructure and the environment.
- Costly repairs and fines: Clogged pipes may require expensive professional cleaning or plumbing repairs. Worse, businesses can face heavy fines for causing sewer blockages or violating regulations. It’s far cheaper to maintain your grease trap than to pay for emergency fixes or penalties.
Cleaning your grease trap regularly is necessary for safety, compliance, and avoiding plumbing disasters. It keeps your kitchen running smoothly and odor-free, and it’s an expected part of food service operations.
How often should a grease trap be cleaned?
The required frequency of grease trap cleaning depends on usage, trap size, and local laws. A common guideline is known as the “25% rule” (or 1/4 rule) used by many health and water authorities. This rule states that when the trap is 25% full of FOG and solids, it’s time to clean it.

In other words, once a quarter of the trap’s volume is occupied by grease and settled waste, the trap can’t effectively do its job – much like trying to pour water into a cup that’s already filled a quarter with sludge. Waiting beyond this point risks grease washing out of the trap and into your pipes.
For many restaurants, the 25% threshold is reached in about 1 to 3 months of normal operation. Thus, a common recommendation is to clean commercial grease traps at least every 3 months (quarterly) at minimum. However, frequency can vary:
- High-volume kitchens: Busy establishments (like a fried chicken fast-food restaurant or a hotel kitchen) generate a lot of grease and may need monthly cleaning or even more frequently. If you’re doing heavy frying and grilling every day, monthly service is wise. In some cases, traps in extremely busy kitchens might be checked even weekly.
- Lower-volume or small traps: A small café or a facility with a smaller under-sink trap might get by with cleaning every 2–3 months if grease output is low. Always monitor the trap’s grease level to adjust the schedule.
- Outdoor grease interceptors: Large outside grease interceptors (usually found underground with manhole covers) have much higher capacity (hundreds of gallons) and typically are serviced every 3 months (quarterly) as standard practice. Their larger volume means they fill up more slowly relative to their size. Still, if an outdoor interceptor hits 25% full before three months, it should be cleaned sooner.
- Local regulations: Always check your local laws or codes. Many municipalities require documented grease trap cleaning on a set schedule (often at least quarterly) to remain in compliance. For example, a city might mandate cleaning every 90 days, or even monthly for certain high-grease generators. Not adhering to these rules could result in fines or permit issues.

Tip: Keep a log of when the grease trap is cleaned and how much waste is removed. Monitoring the accumulation rate helps determine the optimal cleaning frequency for your operation. It’s also useful for inspections to show you are maintaining the trap properly.
A good practice is to schedule regular cleanings in advance (e.g., put it on a calendar or maintenance checklist) so it doesn’t get forgotten. Some food businesses use digital tools or food safety management software to set automated reminders for grease trap service, ensuring this task is never overlooked.
What are the top signs that your grease trap needs cleaning?
Aside from time schedule, be aware of these six warning signs that a grease trap is full or starting to fail:
- Slow-draining sinks: If sink or floor drains in the kitchen are draining slowly, it often means the trap (or the line leaving it) is clogged with grease. Normal flow won’t resume until the trap is cleaned and the pipes are cleared.
- Grease in sink or drains: Seeing greasy residue backing up into sinks or floor drains is a red flag. It indicates the trap can’t hold all the grease and is letting some pass through or overflow.
- Persistent foul odors: A strong, rancid smell around the sinks or the area where the grease trap is located usually means old grease and food waste in the trap are rotting. If you smell it even when the drains aren’t in use, it’s time to check the trap.
- Grease overflow or visible build-up: If you open the trap and see grease piled up thickly on the top, or worse, grease oozing out of the trap seams, it’s overdue for cleaning. Any overflow is a serious indicator that the trap has exceeded its capacity.
- High water level in trap: When inspecting inside the trap, an abnormally high water level (covering the inlet/outlet) can mean the outgoing flow is obstructed by grease buildup. The water has nowhere to go because the trap is clogged, which is a sure sign it needs pumping.
- Increased pest activity: As mentioned, a neglected trap can attract pests. If you notice a surge in fruit flies, roaches, or rodents in the kitchen with no other explanation, the grease trap could be the hidden culprit.

Don’t wait for these signs to become severe. Ideally, adhere to a routine cleaning schedule so you never reach the point of backups or foul odors. If any of these signs occur well before your next scheduled cleaning, adjust your maintenance frequency accordingly.
How to clean a grease trap (step by step)
Cleaning a grease trap can be a messy job, but with the right tools and approach, kitchen staff can handle cleaning smaller indoor traps. Larger underground interceptors will require professional service (we’ll discuss that shortly). Here’s a step-by-step guide on how to clean a typical indoor grease trap safely and effectively:
Preparation and safety
Before starting, gather your supplies and ensure safety measures are in place:
- Protective gear: Wear heavy-duty rubber gloves, as the contents of a grease trap are unsanitary and can irritate skin. Also use safety goggles to prevent splashes into your eyes, and consider a face mask or respirator if odors are strong. Old clothes or coveralls are recommended – you don’t want to ruin your chef uniform!
- Ventilation: Grease traps can produce noxious gases (like hydrogen sulfide). Make sure the area is well-ventilated. Open a door or window or turn on the kitchen hood vent. This will help dissipate odors and any potentially harmful gases. (Check out our restaurant hood cleaning guide and safety poster).
- Floor covering: Lay out plastic sheeting or cardboard around the trap area to catch any splashes or drips.
- Gather tools: You’ll need a wrench or screwdriver (to remove the trap lid if it’s bolted down), a pry bar if the lid is stuck, a scoop or small bucket to ladle out waste, a long-handled scraper or putty knife for scraping, and paper towels or rags for wiping. Have a trash can lined with heavy-duty garbage bags ready for the waste. (Pro tip: put some absorbent material like kitty litter in the bottom of the bag to soak up liquids.) For easier cleanup, also keep some dish detergent and a bucket of hot water nearby for later, as well as a scrub brush or steel pot scrubber.
- Power off equipment: If the trap is connected to any powered equipment or located near electrical outlets, ensure appliances are off to avoid any electrical hazard when water is splashing.
Step 1: Locate and open the grease trap
First, find your grease trap. In many commercial kitchens, a grease trap is a metal box located under the sink or in the floor near dishwashing areas. Once located, carefully remove the lid. Use a wrench to loosen bolts or a pry bar if the lid is heavy or sealed tightly.
Be cautious when lifting the lid. Go slowly in case the contents are under a little pressure. Also, take care not to damage the gasket (seal) under the lid. Set the lid aside (on your plastic sheeting).
At this point, be prepared for the foul smell that will come out once the trap is open. This is normal – decades-old grease has a very pungent odor. Take a small breather if needed and make sure your face protection is on.
Step 2: Inspect the grease level (the 25% rule)
With the trap open, observe how much grease and solids have accumulated. You will typically see a thick layer of brown or yellowish greasy sludge floating on top of water, and some solids settled at the bottom. Use a measuring stick or simply estimate the depth.
If more than 1/4 of the trap’s depth is filled with grease and sediment, it’s definitely due for cleaning. (In reality, if you’ve opened it, you’re going to clean it regardless – but this check gives you an idea of how close you were to the limit.)
This step is also a good time to note if anything looks abnormal, like broken trap components or an unusually high water level which could indicate a clog.
Step 3: Remove grease and solid waste
Now comes the messy part: removing the waste from the trap. Start with the top grease layer:
- Scoop out grease: Using your small bucket or scoop, skim off the thick top layer of grease. It will have a semi-solid, sludge-like consistency. Scoop it gently to avoid splashing. Deposit this grease into your lined trash can. You may mix in absorbent (kitty litter or sawdust) as you add it, to help contain the mess. Continue until most of the floating grease is removed.
- Remove bottom solids: After dealing with the top FOG, there will be food particles and sludge at the bottom. Use a different scoop or even a wet/dry vacuum (shop vac) to suck or scoop out the settled solids and water. A shop vac can be very handy here – many professionals use them to quickly vacuum out liquids and small debris from the trap. If using a shop vac, keep an eye on its fill level; you may need to empty it partway through to avoid overfilling. (Never use a regular vacuum for this – only a wet-rated shop vac, as the waste is liquid and oily.)
- Scrape down the sides and baffles: With most of the liquid and loose waste removed, use your scraper or putty knife to scrape the inner walls, lid, and baffles of the trap. Baffles are the plates or walls inside the trap that help separate grease; they often collect a lot of greasy film. Remove any hardened grease deposits stuck to surfaces. You can hold your trash bag or bucket right under the trap opening as you scrape to catch the scrapings. Make sure to remove any debris blocking the inlet or outlet pipe openings inside the trap as well.
At this stage, the trap should be mostly empty of visible waste. All the major grease and sludge should be out.
Proper disposal: It’s important to dispose of the removed grease and waste correctly. Do not pour it down any drain or toilet. The waste from grease traps is usually classed as solid waste (once absorbed) and can be thrown in the dumpster.
Mix liquid waste with an absorbent like kitty litter until it forms a solid, then seal it in a garbage bag for disposal. Many areas have regulations for grease disposal, so check local guidelines.
Some cities allow solidified grease in landfills, others might require it be handled by a grease recycler. Never dump grease waste outdoors or into storm drains.
Step 4: Clean the trap interior
Now that the bulk of the waste is gone, you should clean the trap to remove residue and help prevent odors:
- Hot water rinse: Pour some hot water into the trap to loosen any remaining grease on the walls and corners. Hot (near-boiling) water will melt residual fats and make them easier to scrub off. Don’t use too much water at once; you’re not trying to flush it down the line, just rinsing the trap itself (you will vacuum or bail this rinse water out as needed).
- Apply degreaser or soap: Use a grease trap cleaner or a degreasing solution (as per manufacturer’s instructions) and apply it inside the trap. If you don’t have a special cleaner, regular dish soap (which is a good degreaser) can work well. Squirt a generous amount on all interior surfaces. Avoid extremely harsh chemical cleaners (like caustic drain openers) for this task – they are not needed and can damage the trap’s metal or kill helpful bacteria in the trap. A mild biological degreaser or enzyme cleaner is a safe choice, or just soap and elbow grease.
- Scrub thoroughly: Using a long-handled brush or scrub pad, scrub all interior surfaces of the trap. Clean the sides, the lid, and especially around baffles and in corners where grease cakes on. If the trap is small, you might have to get a hand inside (hence the long gloves). This scrubbing not only cleans the trap but also helps eliminate sources of odor.
- Final rinse: Once you’ve scrubbed, rinse the trap with hot water again, flushing all loosened residue. If you have a shop vac, you can vacuum out this dirty water too. Otherwise, use your scoop or bucket to bail it out into the waste bin. Continue rinsing until the water you remove is relatively clear, meaning you’ve gotten most of the grease out.
Note: Some municipal guidelines advise against using hot water or soap in a grease trap because if used improperly, it can send grease into the sewer (by temporarily melting it) or disrupt the trap’s biological processes. The key is to not flush large amounts of greasy water down the line.
In our steps above, the hot water and soap are used sparingly and the resulting liquid is removed and thrown away, not allowed to go into the sewer. Never try to clean a grease trap just by pouring hot water or chemicals into it and letting it drain because that defeats the purpose and can push grease into the pipes.
Step 5: Reassemble and restart flow
Now your grease trap is clean! The final steps:
- Reinstall components: Put any baffles or internal components back in the trap if you removed them for cleaning (make sure they’re oriented correctly). Check that the outlet “T” pipe (if present) is in place – this is the down-turned pipe on the outlet side that keeps the grease in the trap.
- Seal the lid: Carefully put the lid back on the grease trap. Ensure the gasket (seal) is seated properly and the lid sits flush. Tighten the bolts or screws securely to prevent leaks and odors escaping. A properly sealed lid will keep smelly gases in the trap where they belong. If the gasket is damaged or the lid doesn’t seal, you may need to replace that gasket to stop odors.
- Dispose of waste properly: Tie up your garbage bags with the removed grease/solids (double bagging is wise) and place them in the dumpster or arrange for proper pick-up according to local rules. Never reuse grease trap waste or pour it elsewhere. Clean up your tools – they will be greasy; use a degreasing detergent on them and rinse with hot water.
- Wash up: Finally, make sure to wash your hands, arms, and any surfaces that came in contact with grease trap contents with a disinfecting cleaner. Grease trap waste is foul and can carry bacteria, so thorough cleanup is important for hygiene.
Your grease trap should now be good to go. Upon reassembly, add water to the trap (if it didn’t automatically refill from the sinks during testing) until the normal operating level is reached. Grease traps need water in them to function and to create a water seal that keeps odors from wafting back up the pipes.
A grease trap is normally full of water during use. The water layer is what allows grease to separate and prevents sewer gases from coming up.
So yes, a grease trap should be full of water when in service (water is the medium that catches the grease). Only the top portion will have floating grease; the bottom and middle are water when the trap is in normal use.
Testing: It’s a good idea to run some water (and maybe a bit of dish soap) down the sink after cleaning to ensure everything is flowing properly. For example, drain a sink full of hot water and watch the trap – the water should flow in and out freely. If it drains well and you don’t see leaks at the lid, you’ve done a successful cleaning.
What are the best tools and agents for grease trap cleaning?
We’ve mentioned some tools during the steps above. Here’s a summary of common tools and cleaning agents used for grease trap maintenance, along with answers to some related questions:
Hand tools
A scraper/putty knife, scoop, and brush are basic tools for manually removing grease and solids. A set of wrenches or screwdrivers is needed to open many trap lids. For floor-installed traps, a small crowbar/pry bar helps lift heavy covers.
Wet or dry vacuum (shop vac)
Yes – you can use a shop vac to clean a grease trap, and it’s often one of the best tools for the job. Professionals frequently utilize industrial vacuum trucks or smaller shop vacs to suck out grease trap contents quickly. If your trap is accessible and the waste isn’t solidified hard, a shop vac can make removal much easier by vacuuming up liquids and loose sludge. Just be very careful to empty and clean the vacuum thoroughly afterward (it will smell). Also, dispose of the vacuum contents properly by mixing with absorbent and bagging it.
Buckets and containers
Use sturdy containers for scooping out grease. A shallow pan or bucket that can fit inside the trap opening works well to bail out liquids. Heavy-duty garbage bags (5-mil thickness or more) are a must for holding the waste.
Kitty litter or absorbents
As noted, clay kitty litter or commercial absorbent (“oil dry”) is extremely useful. It can be placed in trash bags or cans to absorb free liquid grease, turning a soupy mess into a more solid mass that’s easier to handle and less likely to leak. This is a pro tip to avoid spills when transporting grease waste.
Degreasers and cleaners
A grease trap cleaning solution or degreaser helps break down the sticky grease residues. Which cleaning agent is most effective for removing grease? In practice, hot water and a good detergent (dish soap) are very effective at cutting grease in a trap.
Many commercial kitchen cleaners swear by plain Dawn dish soap because it’s formulated to cut kitchen grease. There are also bio-enzymatic cleaners designed for grease traps, which use bacteria or enzymes to digest grease. For example, products like Green Gobbler or BioOne introduce friendly bacteria that eat FOG over time. These can be used after cleaning for maintenance (more on that later).
If you prefer a heavy-duty chemical degreaser, choose one intended for kitchen grease (alkaline surfactant cleaners) and follow the instructions. Always **avoid pouring harsh chemical drain openers (like lye or acid) into the grease trap; they can damage the trap and plumbing and are dangerous for staff. Additionally, bleach is not effective on grease and should not be mixed with other cleaners in the trap.
Does CLR clean grease traps?
CLR is a household cleaner known for dissolving Calcium, Lime, and Rust – it’s an acidic cleaner for mineral deposits, not formulated for grease. Using regular CLR in a grease trap would not be effective for breaking down greasy sludge.
However, the company behind CLR does offer a product called CLR PRO® Bio-Enzymatic Drain Maintainer, which is specifically made for grease trap maintenance. This product contains bacteria that digest grease (essentially similar to other enzyme-based grease trap treatments) and can help maintain a trap by preventing buildup. It’s used by adding a measured amount regularly (often via automatic dosing pump) to keep grease from accumulating.
Don’t use regular CLR for cleaning a grease trap. If you want a CLR-branded solution, use their grease trap treatment product or other enzyme cleaners as a preventative measure, after the trap has been pumped clean.
What’s the best degreaser for grease traps
There isn’t one single brand that’s universally “best,” but look for commercial kitchen degreasers which are often citrus-based or alkaline cleaners that emulsify grease. Some operations use floor degreaser or oven cleaner products on the trap. Just use caution: if a cleaner emulsifies grease, be sure you still remove that liquid from the trap and don’t flush it into the sewer.
Enzyme/bacterial solutions are considered very effective because they actually break grease down into water and CO₂ over time. These are great for odor control and reducing buildup, but they work slowly and are more for maintenance between physical cleanings.
You should never rely on chemicals alone in place of physically cleaning a grease trap. You might come across tips like pouring boiling water or vinegar or commercial additives to “dissolve” grease. While boiling water can help melt grease, it’s a temporary fix. That grease can resolidify further down your pipes.
Boiling water as a daily measure might help reduce odors a bit by flushing out some light FOG and killing odor-causing bacteria, but it’s not a substitute for proper cleaning. Similarly, enzyme treatments can greatly reduce grease, but most health departments still require periodic pumping of the trap to remove all solids and non-digestible waste. Use cleaners and additives as complementary measures, not a free pass to skip pumping.
What are the best practices for grease trap maintenance?
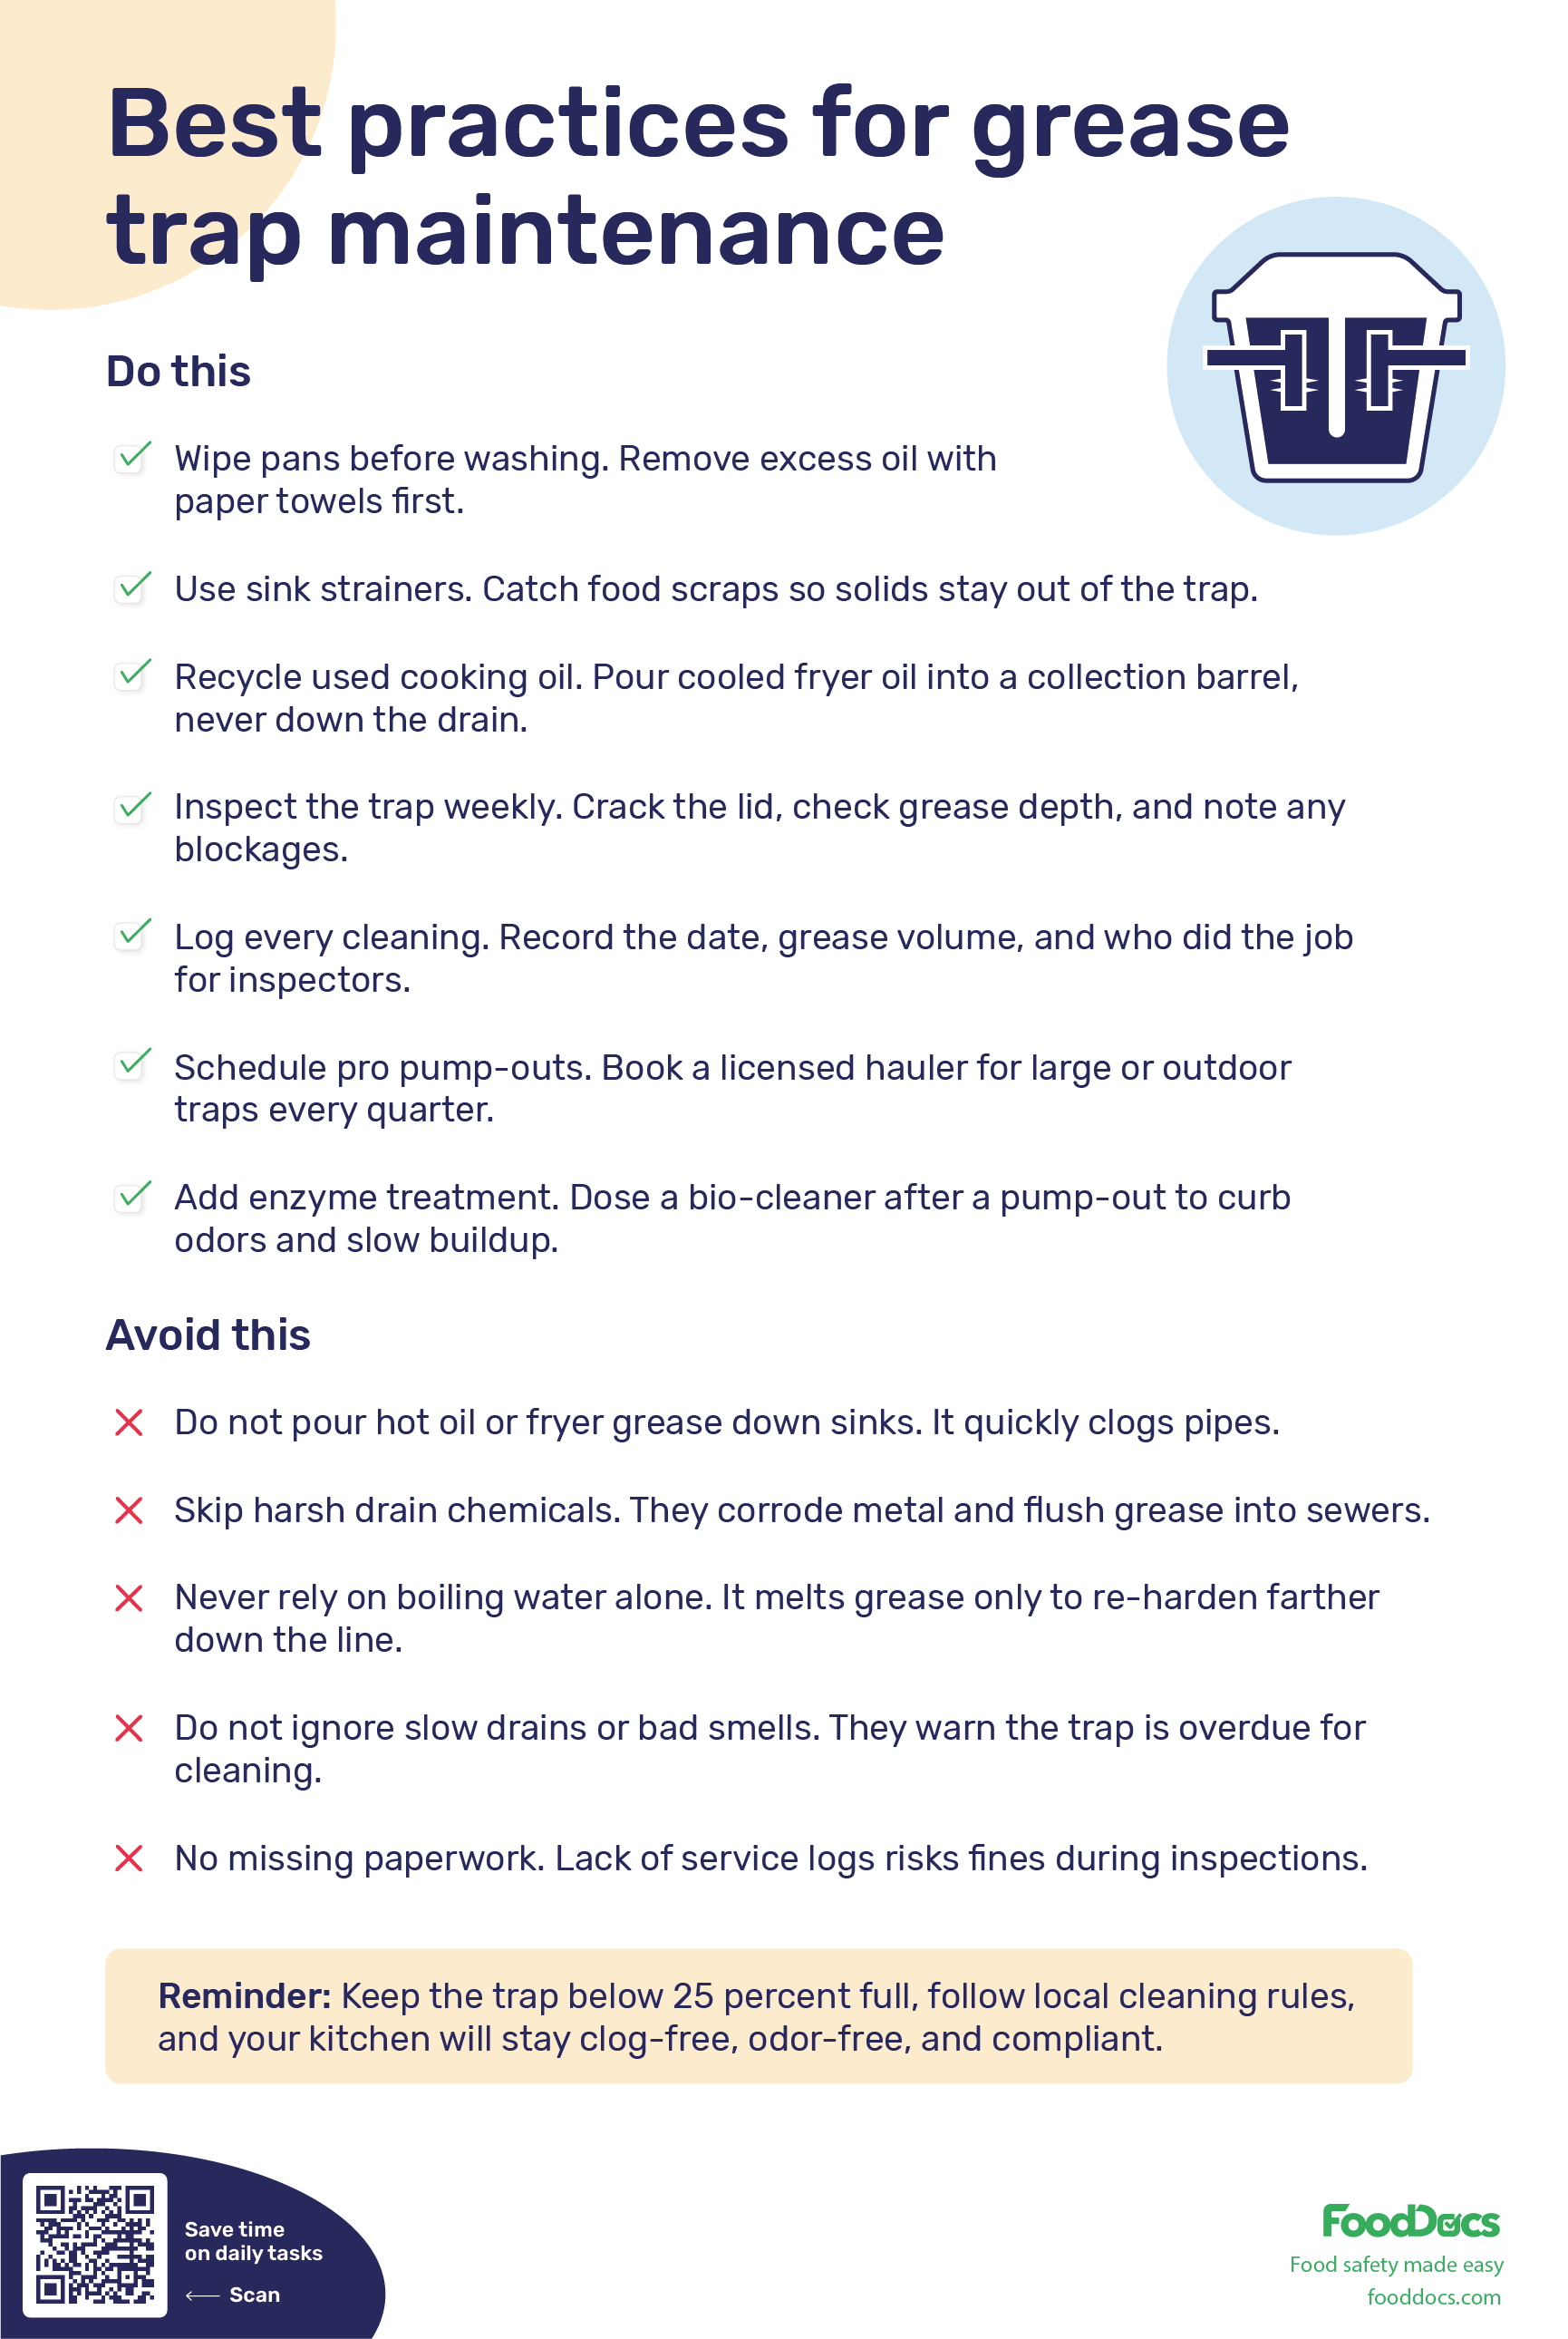
Cleaning the trap on schedule is essential, but good day-to-day habits can lighten the grease load and keep your trap working efficiently for longer. Here are some maintenance tips and best practices for kitchen staff and managers:
Minimize grease going down the drain
The less grease you send into the trap, the better. Wipe down pots, pans, and griddles with paper towels before washing them to remove excess oil and grease. Instruct staff to scrape food scraps and pour out used oil into appropriate containers (for recycling or disposal) instead of rinsing everything down the sink. By keeping solid food waste and large volumes of oil out of the drain, your grease trap won’t fill up as quickly.
Use sink strainers and food waste bins
Food particles that end up in the trap contribute to the sludge layer and odors. Use sink strainers to catch food bits and throw them in the trash or compost instead. Avoid over-reliance on garbage disposals for grease-producing foods; grinding scraps into tiny particles can make them more likely to accumulate in the trap.
Recycle used cooking oil
Have a system for collecting used fryer oil and grease in containers to be recycled, rather than dumping it into the sink. Many areas have services that pick up used cooking oil for biofuel production. This not only reduces what goes into your trap but is environmentally responsible. Keep a grease recycling barrel in your back-of-house and train staff to pour cooled oil into it.
Avoid hazardous “quick fixes”
As mentioned, do not pour chemicals like acids or solvents into the trap hoping to clear it. They can damage the trap’s components and create safety hazards. Also, never flush enzymes or emulsifiers right before an inspection or instead of pumping – some operators try to liquefy and flush out grease to avoid a pump service, but this just pushes pollution to the public sewer and can lead to major fines if caught. In fact, some municipalities ban adding enzymes or chemicals directly to grease traps because they want the grease kept in the trap, not passed downstream. Always follow local regulations regarding any additives.
Regular inspections
Don’t wait until the trap completely backs up to check it. Inspect the grease trap routinely, say every week or two, by quickly opening the lid and looking at the grease level (if you can do so safely and briefly). This will tell you if you’re on track with your cleaning schedule or if you need to adjust it. Also, look for any damage like cracked lids, missing baffles, or clogs in the inlet/outlet. Catching issues early can prevent bigger problems.
Keep a maintenance log
Maintain a simple maintenance log sheet in the kitchen where staff record the date of each grease trap cleaning (and who did it, plus how much waste was removed, if possible). Many jurisdictions require such logs for inspectors, and it also helps you optimize cleaning frequency. Modern solutions like digital food safety management systems can simplify this – for example, scheduling grease trap cleaning in a digital checklist and getting reminders. (This is where software like FoodDocs or similar can help by keeping all cleaning tasks tracked and documented automatically.)
Watch for trouble signs
Train your team to notice and report if sinks are draining slowly or if any bad smells are coming from floor drains, etc. A quick response (checking and cleaning the trap) can avert a full-blown backup in the middle of a dinner rush.
Manage grease trap odors
Even with regular cleaning, grease traps can sometimes smell. To fix a smelly grease trap, first make sure it’s cleaned out – a clean trap should not have significant odor. If odor persists, check that the trap lid is tightly sealed (odors leaking from a bad gasket or crack can be a problem). Ensure the trap’s vent pipe (if it has one) is not clogged – vents allow smelly gases to escape outside instead of into the kitchen.
For ongoing odor control, some establishments use grease trap additives like bacteria blocks or liquid maintainers that specifically target odors by digesting the organic matter. Baking soda or vinegar won’t do much for a large trap, but a professional bacterial maintainer can eat away at odor-causing gunk. Just remember, if you sanitize sinks with bleach or hot water, those actions can kill beneficial bacteria additives, so choose an approach and use it consistently, whether it's bacterial or chemical.
After a thorough cleaning, you can pour a half cup of baking soda and vinegar into the trap and let it sit, then flush with hot water – this can neutralize some odors naturally (just don’t rely on this instead of actual cleaning). Ultimately, the best cure for odors is preventative maintenance and frequent cleaning.
Following these best practices will help reduce how quickly grease accumulates and you’ll have fewer nasty surprises. A well-maintained grease trap not only prevents emergencies but can also extend the life of the trap itself.
For example, a steel grease trap that is cleaned and not exposed to corrosive chemicals can last many years. On average, a grease trap can last 7 to 10 years if well maintained. Some sources even suggest 5–7 years for metal traps (since they can rust), or up to 10–15 years for larger systems if cared for. Your maintenance efforts protect your investment in the equipment, too.
Grease trap cleaning: DIY vs professional services
Many commercial kitchens opt to hire professional grease trap cleaning services (often called “grease trap pumping” services) to handle this unpleasant task. Here’s what to consider when deciding between do-it-yourself cleaning and professional pumping:
Trap size and location
Small indoor grease traps (usually 5 to 50 gallons) can often be cleaned by the kitchen staff as we described. If you’re comfortable with the process and properly equipped, DIY can save money.
However, large grease interceptors (hundreds of gallons, often located outdoors underground) require a professional pumper. These are typically cleaned by vacuum trucks that can suck out large volumes of FOG and water quickly.
Many jurisdictions require licensed waste haulers to handle grease interceptor pumping due to the volume of waste and proper disposal needs. So, if you have a big in-ground trap (common for large restaurants), you’ll need to schedule a service to pump it out periodically.
Regulatory requirements
Some areas permit internal staff to clean indoor traps, while others may require a certified grease waste hauler for all grease traps. There are places where, for example, even removing a small trap’s grease requires a permit because the waste is considered environmentally regulated.
Check your local regulations: you might be permitted to DIY with certain conditions and must dispose of waste properly, or you might be obligated to use a licensed service. When in doubt, consult the local health or environmental authority.
Convenience and consistency
Professionals handle grease traps every day – they have the tools (pumps, vacuums), experience, and means to dispose of the grease legally. Hiring a service can be convenient, as they often come on a set schedule (e.g., every month or quarter), so you don’t even have to think about it.
This can ensure consistency in maintenance, which is attractive for busy kitchen managers. It also frees up your staff from a very dirty chore.
Thoroughness
A reputable grease trap service will not only pump out the trap but also scrape down the sides and clean the interior, similar to the steps we outlined.
They might do it faster and more thoroughly given their equipment (some use high-pressure water or specialized scrapers). They also haul away the waste and provide documentation.
If your staff are not keen on doing a deep clean or might miss certain areas, a pro could do a better job and check that everything’s in order. For example, they might notice if a baffle is broken or if the trap seems to be leaking.
Cost
Of course, professional service comes at a cost. How much does grease trap cleaning cost? Typical prices for professional pumping range from about $125 up to a few hundred dollars per service depending on the trap size and region. For example, one industry source notes indoor traps (small) on a regular service plan might cost $125–$180 per visit for monthly cleaning.
Outdoor interceptors (large) could be $225–$300 or more each pump (usually quarterly). Extremely large grease interceptors or those that have been neglected (requiring extra time) can cost more, sometimes up to $500 or more if they are very difficult.
If a trap hasn’t been serviced in a long time and the waste has hardened, a company may charge extra for the additional labor. It’s always wise to get a quote. Some companies offer discounts if you sign up for a recurring schedule (contract).
Avoiding emergencies and fines
Consider that the cost of regular cleaning is an investment to avoid much costlier problems. A single backup or overflow incident could cost you lost business (if you have to shut down to fix it) and expensive emergency plumbing bills.
If authorities find you haven’t maintained your grease trap and it causes a sewer blockage or overflow, fines can be steep, sometimes running in the thousands of dollars for cleanup costs. Regular service is cheap insurance by comparison.
For small traps, you might choose to handle it in-house if your staff is trained and equipped. Just ensure it’s done on schedule. For larger traps or for ease, a professional grease trap cleaning service is highly recommended.
Many restaurants use a hybrid approach: in-house staff might check the trap and perform interim skimming or partial cleanings, but a professional comes periodically for a full pump and clean. This keeps things under control and documented.
How top foodservice businesses never forget grease trap maintenance tasks
Incorporate grease trap checks into your kitchen’s routine. For example, as part of a monthly cleaning checklist or as a scheduled task in your food safety plan. Food safety software such as FoodDocs helps by reminding you and keeping digital logs
You’ll keep your back-of-house running clean, your chef and inspectors happy, and your business in good standing with local regulations. Grease trap cleaning might not be the most glamorous part of food service, but it’s one of the most important for a trouble-free kitchen.
For example, set a recurring task to maintain the grease trap when it becomes 25% full and schedule a commercial grease trap cleaning once per quarter. You can get set up fast and try it out with a 14-day free trial!


Each task can include step-by-step instructions so your team knows exactly what to do. When it’s done, they check it off in real time. Managers can see progress at a glance, even if they’re not on-site.

Best of all, FoodDocs keeps a digital monitoring log for everything. So if an inspector asks for proof of your last exhaust hood cleaning, it’s right there, no paperwork shuffle required.

With tools like this, staying clean and compliant becomes part of your kitchen’s routine. It saves time, cuts stress, and helps your team stay ready for anything.
Keeping your restaurant’s grease trap clean is an ongoing responsibility, but with the right approach, it becomes part of your kitchen’s rhythm. Stick to a maintenance schedule, know when to bring in the pros, and use tools like checklists (or better yet, FoodDocs’ digital checklists) to stay organized.
Your reward will be a safer kitchen, better air quality, and the confidence that you’re protecting your team and guests every day.

![]() An automated setup enables you to go digital in 15 minutes
An automated setup enables you to go digital in 15 minutes
![]() Our app notifications help your team to remember all daily tasks bam
Our app notifications help your team to remember all daily tasks bam
![]() Save time on supervising and use automatically filled monitoring sheets
Save time on supervising and use automatically filled monitoring sheets